Dockerizing my Development Process
07 Jun 2016 · CommentsI’m a big fan of using Vagrant for development. I really like the approach of installing the framework, database and development tools on a project-specific virtual machine that can be shared with the other folks on the team.
But Docker is the shiny new toy that promises development / production parity, allowing infrastructure to be scripted alongside the code and run in these light-weight container thingy-me-bobs.
Does Docker live up to its promises? Is it time to evict the Vagrant? I’ve developed a simple web app to find out…
Table of Contents
-
The Basics - describes the installation process and explains the basics of running Docker commands.
-
Introducing Quotster - introduces the sample application.
-
Getting Started - running an interactive terminal in Docker to install npm packages and run a simple web server.
-
Prototyping - using Docker Compose to run the web server, and a custom Docker image that restarts it when the code changes.
-
Adding the Database - links in a MongoDB container to store the data.
-
Scaling Up - adds a load balancer and scales to multiple instances of the web container.
-
Releasing to Production - using Docker Machine to create a Digital Ocean droplet to run the application in the cloud.
The Basics
The first task is to install the Docker Toolbox. If you’re using OSX or
Windows, this will create a Linux VM (using VirtualBox) that runs Docker. It
also installs a command-line tool called Docker Machine which forwards
docker commands from your terminal to the VM.
But wait… weren’t we supposed to be getting rid of VMs? Well at the moment Docker is only available on Linux, and even when it arrives for Windows / Mac you won’t be able to run a Windows container on a Linux base machine (or vice versa). Since I’m ultimately deploying my application to a Linux server, I can live with the cost of a single Docker VM on my laptop.
Once you have Docker installed you can open the “Docker Quickstart Terminal” and run the following command:
$ docker run ubuntu echo Hello World

Hello World
…where ubuntu is an image and echo Hello World is a command.
Images are virtual file systems that have software installed on them, in this case it’s Ubuntu. If Docker cannot find the image locally, it will download it from the Docker Hub where you can find thousands of pre-defined images.
Docker creates a container, i.e. an instance of the image, and runs the command inside it. Once the command completes the container is spent. Although you can restart a container, it’s better to think of them as disposable runtimes for your commands.
You can list the spent containers:
$ docker ps -a

CONTAINER ID        IMAGE               COMMAND              CREATED             STATUS                     PORTS               NAMES
49df8a0b5a76        ubuntu              "echo Hello World"   2 minutes ago       Exited (0) 2 seconds ago                       stoic_curie
…and clean them up by using the first few characters of their ID:
$ docker rm 49d
You can also view and manage your local images by using the docker images
command.
Introducing Quotster
My sample app is a quote wall where you can record insightful, life-changing nuggets of information; or mildly amusing nonsense that you find on Twitter:
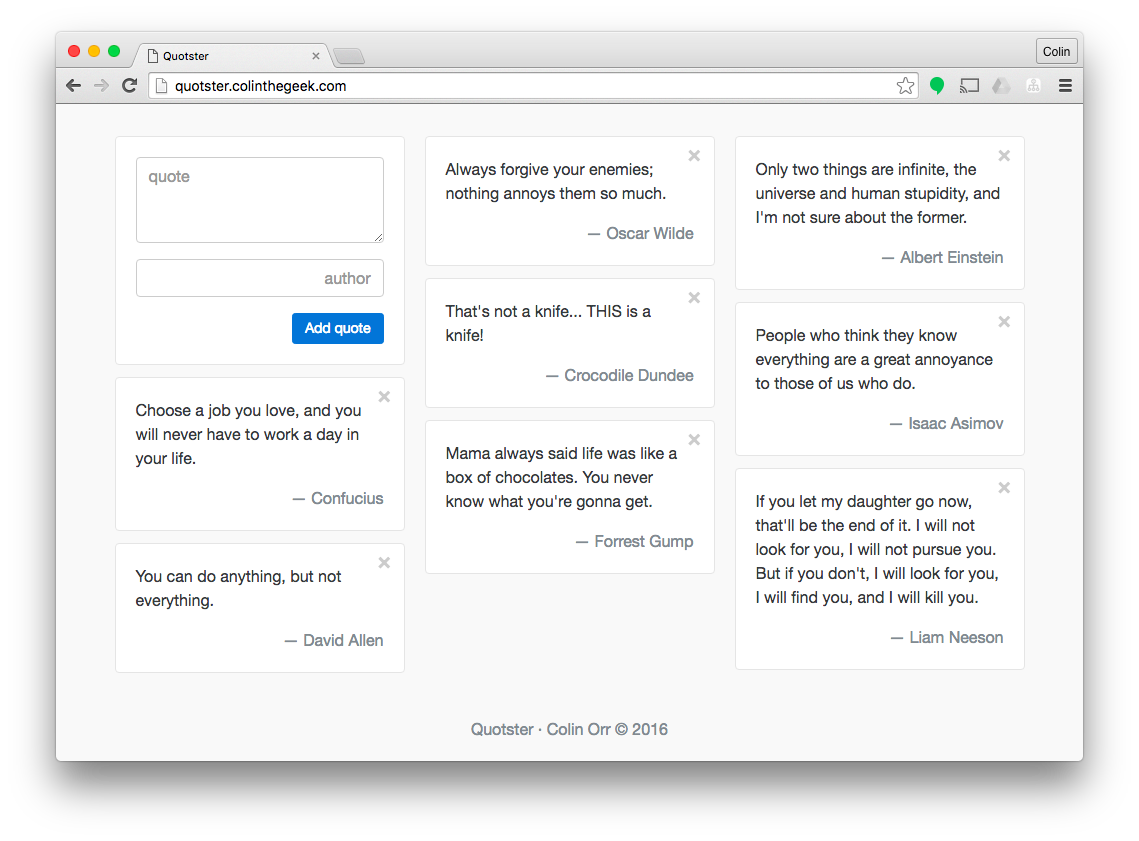
It’s a Node web server backed by a MongoDB database. The web application can be scaled out behind a round-robin load balancer called HAProxy.
Getting Started
The first task is to get a simple web server running. Normally I would create
a new Vagrant machine, connect to it using SSH, and install the version of Node
that I want for the project. Then I would use npm from the Vagrant machine
to install a web server package into my project folder (which is shared
automatically between the VM and host).
The good news is that you can do the same thing using Docker… with a few magic switches:
$ docker run -i -t -v $(PWD):/code -w /code -p 3000:3000 node bash
Let’s start on the right-hand side, I’m telling Docker that I want to run the
command bash on a container. The image for the container is the official
node image from Docker Hub.
The -i -t switches tell Docker to run an interactive shell, without these the
container will run bash and exit immediately. -v $(PWD):/code will mount the
current directory into the container and -w /code sets it as the working
directory.
Finally -p 3000:3000 forwards port 3000 on the container to the host. We’ll
use this later to test the web application from a browser.
Now we can use npm from inside the container to create a package.json and install the Koa web server package:
$ npm init

name: quotster
version: 1.0.0
description: A sample web application to try out Docker.
entry point: server.js
test command:
git repository:
keywords:
author: Colin Orr
license: MIT

$ npm install koa --save
Note: I’ve changed the entry point from the default index.js to server.js.
Here’s the code for a simple “Hello World” web app, use your favourite text
editor to save it to server.js in the root of your project:
// server.js

const koa = require('koa');
const app = koa();

app.use(function *() {
  this.body = 'Hello World';
});

app.listen(3000, () => console.log('server listening on port 3000'));
Start your web server by running the following command from your Docker terminal:
$ npm start

npm info it worked if it ends with ok
npm info using npm@3.8.9
npm info using node@v6.2.0
npm info lifecycle quotster@1.0.0~prestart: quotster@1.0.0
npm info lifecycle quotster@1.0.0~start: quotster@1.0.0

> quotster@1.0.0 start /code
> node server.js

server listening on port 3000
Now you can visit the website on http://192.168.99.100:3000.
Prototyping
The next stage is to do some prototyping, installing more npm packages and scaffolding out the most of the application using static data. Repeatedly typing that docker command with all of those switches is going to get tiresome really quickly!
There’s another tool called docker-compose which allows you to move these
switches into a configuration file:
# docker-compose.yml

version: '2'
services:
  web:
    image: node
    working_dir: /code
    command: npm start
    volumes:
      - .:/code
    ports:
      - 3000:3000
Save this file as docker-compose.yml in the root of the project folder and
launch your container by running the following command:
$ docker-compose up
This will start the container and run the web server. You can connect to the container and run interactive commands by opening a second Docker Quickstart Terminal and running:
$ docker-compose exec web bash
…where web is the service name from the yaml file, and bash is the
command to run.
From here we can install some more packages:
$ npm install koa-logger --save
$ npm install koa-route --save
$ npm install koa-body --save
$ npm install koa-pug --save
…and enhance our application to include logging, routing and rendering HTML using Pug (formally called Jade):
// server.js

const koa    = require('koa'),
      logger = require('koa-logger'),
      route  = require('koa-route'),
      body   = require('koa-body'),
      Pug    = require('koa-pug');

const app = koa();
const pug = new Pug();

app.use(logger());
app.use(body());
pug.use(app);

let quotes = [
  { id: 1, quote: 'You can do anything, but not everything.', author: 'David Allen' },
  { id: 2, quote: 'Always forgive your enemies; nothing annoys them so much.', author: 'Oscar Wilde' },
  { id: 3, quote: 'Choose a job you love, and you will never have to work a day in your life.', author: 'Confucius' }
];

app.use(route.get('/', function *() {
  this.render('client', quotes);
}));

app.listen(3000, () => console.log('server listening on port 3000'));
Note: if you’re following along at home, you’ll need to grab a copy of my
HTML template and save it to client.pug.
One annoyance is having to stop and start the web server each time we make a change to the source code. To avoid this, we could use nodemon to watch for changes and restart the server.
Nodemon in an npm package that has to be installed globally. Although we could
do this on the running container, it would be lost when the container is stopped
and discarded. It’s better to add it to the image, and that means writing a
custom Dockerfile:
# Dockerfile

FROM node
RUN npm install -g nodemon
Now we can change our docker-compose.yml to build this image and execute
the server using nodemon:
version: '2'
services:
  web:
    build: .
    working_dir: /code
    command: nodemon -L
    volumes:
      - .:/code
    ports:
      - 3000:3000
Apply these changes by running the following commands on your host:
$ docker-compose down
$ docker-compose up
Docker Compose will build your custom image and use it instead of the official node image. Now you’ll find that the server restarts automatically as you save the source code.
Adding the Database
Docker Compose can manage multiple containers for a project, creating a private network between them so that they can communicate. Let’s add the official mongo image into the mix to save our data:
# docker-compose.yml

version: '2'
services:
  db:
    image: mongo
  web:
    build: .
    working_dir: /code
    command: nodemon -L
    volumes:
      - .:/code
    ports:
      - 3000:3000
    depends_on:
      - db
So we’ve configured MongoDB to run under a service called db. I’ve added a
depends_on clause to our web application, this helps Docker Compose decide
the order in which to load the containers.
Services can be referenced by other containers by using their name, db in this
case. Take a look at the final version of the server and you’ll see the database
URL at the bottom:
// server.js

...

mongoose
  .connect('mongodb://db/quotster')
  .then(() => console.log('database connection established'))
  .then(() => app.listen(3000, () => console.log('server listening on port 3000')));
Docker sets up a private network between containers so your database never needs to be exposed externally. Another advantage - no more configurable connection strings that change between deployments 😃.
You can still access the data directly by starting an interactive session on the database container, then query the database using the mongo command-line client:
$ docker-compose exec db bash
$ mongo

> use quotster
switched to db quotster
> db.quotes.find()
{ "_id" : ObjectId("57518fa80331e31400751728"), "quote" : "You can do anything, but not everything.", "author" : "David Allen", "date" : ISODate("2016-06-03T14:09:44.483Z"), "__v" : 0 }
{ "_id" : ObjectId("57518fc70331e31400751729"), "quote" : "Always forgive your enemies; nothing annoys them so much.", "author" : "Oscar Wilde", "date" : ISODate("2016-06-03T14:10:15.869Z"), "__v" : 0 }
{ "_id" : ObjectId("57518fdb0331e3140075172a"), "quote" : "Choose a job you love, and you will never have to work a day in your life.", "author" : "Confucius", "date" : ISODate("2016-06-03T14:10:35.696Z"), "__v" : 0 }
Note: the mongo image has different options to control where the container stores the physical data.
Scaling Up
Scaling and load balancing is something I’ve never attempted on my development rig, but Docker makes it easy!
Lets introduce the haproxy load balancer from Docker Hub:
# docker-compose.yml

version: '2'
services:
  db:
    image: mongo
  web:
    build: .
    working_dir: /code
    command: nodemon -L
    volumes:
      - .:/code
    depends_on:
      - db
    expose:
      - 3000
  lb:
    image: dockercloud/haproxy
    links:
      - web
    volumes:
      - /var/run/docker.sock:/var/run/docker.sock
    ports:
      - 80:80
I’ve removed the port forwarding from the web application, instead I’m using
expose to state the port that it’s using. The load balancer uses links to
identify the services to balance, and port 80 is exposed to the outside world.
When you do a docker-compose up you can see the load balancer has been
added to the mix from the server logs, and you can visit the site on
http://192.168.99.100.
In a separate terminal, scale up the web instances with the following command:
$ docker-compose scale web=3
Refresh the homepage a few times and you’ll see the load balancer in action from the server logs:
web_1  |   <-- GET /
web_1  |   --> GET / 200 7ms 1.03kb
web_3  |   <-- GET /
web_3  |   --> GET / 200 213ms 1.03kb
web_2  |   <-- GET /
web_2  |   --> GET / 200 206ms 1.03kb
web_1  |   <-- GET /
web_1  |   --> GET / 200 5ms 1.03kb
Running docker-compose ps will show the containers and port mappings:
$ docker-compose ps

Name                  Command             State                   Ports
--------------------------------------------------------------------------------------------
quotster_db_1    /entrypoint.sh mongod         Up      27017/tcp
quotster_lb_1    tini -- dockercloud-haproxy   Up      1936/tcp, 443/tcp, 0.0.0.0:80->80/tcp
quotster_web_1   nodemon -L                    Up      3000/tcp
quotster_web_2   nodemon -L                    Up      3000/tcp
quotster_web_3   nodemon -L                    Up      3000/tcp
Running docker-compose stop will bring down all the containers in one go.
Releasing to Production
The final test for Docker is to take my micro server farm of containers and run it on a Digital Ocean droplet in the cloud.
My web application is currently running the code from a shared volume on my
laptop, when I push to the cloud this won’t be available so I need to tweak the
Dockerfile to build the code into the image:
# Dockerfile

FROM node
RUN npm install -g nodemon
COPY . /code
Now when I call docker-compose build the resulting image will include the
Quotster source code, but docker-compose.yml still has the configuration
which overrides this folder with the shared volume. That’s OK for development,
but we don’t want this to happen for production.
To solve this problem, Docker Compose has a nice feature that allows you to split you configuration file into a base file with overrides for different environments:
# docker-compose.yml

version: '2'
services:
  db:
    image: mongo
  web:
    build: .
    working_dir: /code
    depends_on:
      - db
    expose:
      - 3000
  lb:
    image: dockercloud/haproxy
    links:
      - web
    volumes:
      - /var/run/docker.sock:/var/run/docker.sock
    ports:
      - 80:80

# docker-compose.override.yml

version: '2'
services:
  web:
    command: nodemon -L
    volumes:
      - .:/code

# docker-compose.prod.yml

version: '2'
services:
  db:
    restart: always
  web:
    command: npm start
    restart: always
  lb:
    restart: always
So the common configuration remains in docker-compose.yml, while
docker-compose.override.yml contains the development specific tweaks and
docker-compose.prod.yml contains the production tweaks.
I’ve added a restart: always setting to the production configuration, this
instructs Docker to restart the container automatically if it crashes, or if the
server running the containers is restarted.
You can continue to use docker-compose up for development, if you want to
run with the production configuration you run the following command:
$ docker-compose -f docker-compose.yml -f docker-compose.prod.yml up
We’re ready to push to Digital Ocean. You’ll need to setup an account and generate a personal access token (instructions). Once you have your token, you can run the following command:
$ docker-machine create --driver digitalocean --digitalocean-access-token <YOUR TOKEN> --digitalocean-region lon1 digitalocean
This will create a new $5 a month droplet on Digital Ocean with Docker installed and ready to use.
You can connect to the droplet using Docker Machine:
$ eval $(docker-machine env digitalocean)
$ docker-machine active
digitalocean
This switches the current terminal session to forward all Docker commands to
digitalocean rather than your local Docker VM. So interacting with Docker in
the cloud is exactly the same experience as working with it locally.
Now we can spin up our application:
$ docker-compose -f docker-compose.yml -f docker-compose.prod.yml up -d
Note: the -d switch runs docker in ‘detached’ mode - it will run in the
background and you can close the terminal session without stopping the
containers.
Finally, scale up to 3 instances of the web containers:
$ docker-compose -f docker-compose.yml -f docker-compose.prod.yml scale web=3
You should be able to hit the site from the browser. You can find the public IP address from the Digital Ocean dashboard.
Conclusion
Docker containers do feel a lot faster and more light-weight than Vagrant VMs, but they are rather arduous to manage from the command line.
Docker Compose solves this problem by allowing configuration to be stored in a separate file. It does an excellent job of abstracting the more complicated aspects of Docker like creating private networks and coordinating multiple containers.
Docker Machine is the icing on the cake, allowing you to switch your terminal between development / staging / production servers and run the same commands across the board.
This trio of tools give Docker a compelling story for development, it’s definitely worth trialling on your next project!